DITA-OTのXHTML出力をフレーム形式で表示するための手順
XHTML出力をフレーム形式で表示するには、(1)DITA-OTが出力する目次ファイルのファイル名の変更、(2)フレームセットを定義したindex.htmlの作成、(3)contentwinフレームに最初に表示するdefaultpage.htmlの作成、(4)index.htmlとdefaultpage.htmlをコピーするためのAntビルド・ファイルの変更が必要です。
defaultpage.htmlに会社のロゴマークなどのグラフィック・ファイルを挿入する場合は、DITA-OTのカスタマイズを始める前にグラフィック・ファイルを用意してください。
本トピックでは、DITA Open Toolkit Users Guideで紹介されているXHTMLのカスタマイズ手順を踏襲して、DITA-OTのXHTML出力をフレーム化する標準的な手順を説明しています。
1. DITA-OTが生成する目次ページのファイル名を変更するために、build_dita.batの中のdost.jarの引数に/xhtmltoc:オプションを追加します。
java -jar %DITA_DIR%lib/dost.jar /ditadir:%DITA_DIR% /cleantemp:yes /ditaext:%DITA_EXT% /copycss:yes /csspath:css /cssroot:%DITA_DIR%resource /basedir:%BASE_DIR% /i:%INPUT_FILE% /transtype:%2 /outdir:%BASE_DIR%out\%2 /tempdir:%BASE_DIR%temp /xhtmltoc:toc /indexshow:yes
目次ページのデフォルトのファイル名はindex.htmlです。上記のバッチは、目次ページのファイル名をtoc.htmlに変更しています。
2. %DITA-OT%フォルダの下に、HTMLファイルを保存するためのbuild_filesフォルダを作成します。
3. build_filesフォルダの中に、フレームセットを定義したindex.htmlファイルを作成します。
<html>
<head>
  <meta http-equiv="Content-Type" content="text/html; charset=UTF-8"></meta>
  <title>DITA Open Toolkit XHTML output</title>
  <link href="css/commonltr.css" type="text/css" rel="stylesheet" />
  <!-- link href="css/customized.css" type="text/css" rel="stylesheet" /-->
</head>
<!--The left-hand navigation frame is 30% of the available space -->
<!--The right-hand content frame takes up the rest of the available space -->
<frameset cols="30%,*">
  <!--tocwin is the navigation frame -->
  <frame name="tocwin"     src="toc.html">
  </frame>
  <!--contentwin is the content frame -->
  <frame name="contentwin" src="defaultpage.html">
  </frame>
</frameset>
</html>
4. build_filesフォルダの中に、contentwinフレームに最初に表示するdefaultpage.htmlを作成します。この例では、初期ページに会社のロゴ(ファイル名: company_logo.jpg)を表示するようになっています。
<html>
<head>
  <meta http-equiv="Content-Type" content="text/html; charset=UTF-8" />
  <title>DITA-OT Output</title>
  <link href="css/commonltr.css" type="text/css" rel="stylesheet" />
  <!-- link href="css/customized.css" type="text/css" rel="stylesheet" /-->
</head>
<body>
  <center>
    <br/><br/><img align="center" src="company_logo.jpg">
  </center>
</body>
</html>
5. build_filesフォルダの中にあるファイルをコピーするために、まず%DITA-OT%build_dita2xhtml.xmlを変更します。
<project name="dita2xhtml" default="dita2xhtml">
    <property name="transtype" value="xhtml"/>

    <import file="build_init.xml" />
    <import file="build_preprocess.xml" />
    <import file="build_general.xml" />

    <!-- @@@ added the copy-build-files target as one of the depended target -->
    <target name="dita2xhtml"
      depends="build-init, preprocess, dita.map.xhtml, copy-revflag,
               copy-css, copy-build-files, dita.topics.xhtml, dita.inner.topics.xhtml, dita.outer.topics.xhtml">
    </target>
        :
        :
dita2xhtmlターゲットの中に、copy-build-filesというターゲットを追加しています。
6. copy-build-filesターゲットの実装コードを、%DITA-OT%build_preprocess_template.xmlの末尾に記述します。
        :
        :
  <!-- depecrated: keep for back-compatibility -->
  <target name="move-index-entries" depends="move-meta-entries"/>

  <!-- @@@ Copy build_files folder -->
  <target name="copy-build-files"
          description="Copy build_files folder">
    <copy todir="${output.dir}">
      <fileset dir="${dita.dir}${file.separator}build_files"/>
    </copy>
  </target>

</project>
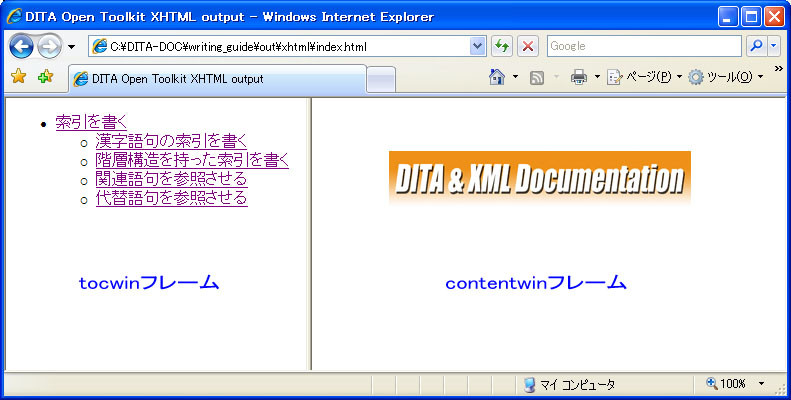
カスタマイズしたDITA-OTを使ってXHTMLを生成すると、下図に示したように、目次とトピック・コンテンツが1つのウィンドウの中に表示されます。

関連情報
DITA-OT1.4.3をコマンド・プロンプトから簡単に実行するためのバッチ
build_dita.batを紹介したページです。